Even after deleting a contact in Mac Mail, the contact’s e-mail address will still appear in the auto-complete bar. To remove an email address from the auto-complete list in Mac OS X Mail:

  • Start typing the recipient’s address or name in a new message.
  • Select the desired address from the auto-complete list as if you’d compose an email to them.
  • Click the small down arrow in the recipient.
  • Select Remove from Previous Recipients List from the menu.

You can also search for the unwanted address directly in the previous recipients list:

  • Select Window | Previous Recipients from the menu in Mac OS X Mail.
  • Highlight the address you want to remove.
    • You can highlight multiple addresses by holding down the Command key.
  • Click Remove from List.

Today we recieved a fraudulent e-mail claiming domain names very similar to are own. This is a scam.
Here is a copy of this e-mail.
———- Forwarded message ———-
From: “mark@ds-global.net”
Date: Mon, 16 Aug 2010 15:44:00 +0800
Subject: URGENT Registration Notice For cksolutions
To:
(It’s very urgent, Please transfer this email to your CEO or
appropriate person, Thanks)
Dear CEO/Principal,
This is Mark Dong —Senior Consultant of domain name registration and
solution center in china. have something to confirm with you. We
formally received an application on August 16, 2010, one company which
self-styled “Everyboy Company” were applying to register “cksolutions”
as Network Brand and following domain names:
“cksolutions.asia
cksolutions.cn
cksolutions.com.cn
cksolutions.com.hk
cksolutions.com.tw
cksolutions.hk
cksolutions.net.cn
cksolutions.org.cn
cksolutions.tw ”
After our initial checking, we found the name were similar to your
company’s, so we need to check with you whether your company has
authorized that company to register these names. If you authorized
this, we will finish the registration at once. If you did not
authorize, please let us know within 7 workdays, so that we will
handle this issue better. Out of the time limit we will
unconditionally finish the registration for “Everyboy Company”.
Best Regards,
Mark Dong
Tel: +86-551-5223-174
Fax: +86-551-5223-175
Address:Room205,Block12,Youth Community(West),Ningguo Road Baohe
District,HeFei,China

10 August

Keyboard Replacement

Uncategorized

Keyboard replacements from 30€ for more details please [intlink id=”2″ type=”page”]contact us[/intlink]
Instructions:

  1. Power off laptop and take out batter
  2. Most laptops have one screw holding the keyboard at the back of laptop.
  3. Remove those screws with Phillips screwdriver.
  4. At this point keyboard might come out if not it may need to be taken apart more.
  5. Turn the laptop back over and try take out keyboard n.b see if the keyboard is tucked under any plastic pieces.
  6. Unscrew any screws at the top and remove the keyboard itself from top to bottom.
  7. The keyboard is connected with a thin (ribbon cable), data cable to the system board at the bottom.
  8. Lift the plastic connectors that hold in this data cable in place be very careful.
  9. Carefully remove the data cable.
  10. Now place new keyboard back into ribbon cable slot and put screws back.

Please contact support for more details keyboard replacements from 30€

2 August

How to Remove McAfee

Uncategorized

Add remove programs:

  1. Click on Start, Click on Control Panel2) Double-click on Add or Remove Programs
  2. Find the Network Associates or McAfee product listed and click on it.
  3. Click on Change/Remove
  4. Place a checkmark next to each McAfee product you wish to remove and click Remove

Using MCPR tool:

  1. Click on the following link to download the MCPR removal tool
  2. http://download.mcafee.com/products/licensed/cust_support_patches/MCPR.exe
  3. Click Save and save the file to your desktop
  4. After the removal tool finishes, you should be prompted to restart your computer.
  5. Once the computer restarts, your McAfee product should be uninstalled.


What is KeePass?
Today you need to remember many passwords. You need a password for the Windows network logon, your e-mail account, your homepage’s FTP password, online passwords, control panel for website etc.
The list is endless.
Recommendations: Also, you should use different passwords for each account. Because if you use only one password everywhere and someone gets this password you have a problem… A serious problem. The thief would have access to your e-mail account, homepage, etc. Unimaginable.
Download: http://keepass.info/news/n100709_2.12.html

Before installing fonts, you should close any open applications. For some applications, new fonts do not appear in the font menu if you install them while the application is open.

  1. In the Finder, open the folder or disk that contains the fonts you want to install.
  2. Select the font suitcases for the fonts you want to install.
  3. Drag the fonts to the System Folder. Click OK when prompted.Note: If you want fonts to be availabe to applications running in Classic mode, you must install fonts in Macintosh TrueType or Macintosh PostScript format into the Fonts folder inside the Classic System Folder.

Auto Login Comptuer:
In the Run text box, type control userpasswords2 and click OK:

1. Win Key + R –> control userpasswords2 –> enter
Uncheck the checkbox that says “Users must enter a user name and password to use this computer.”:
Click OK
When the dialogue box pops up, type in your username and password (if you do not have a password, leave it blank)

25 July

Windows 7 Snipping Tool

Uncategorized


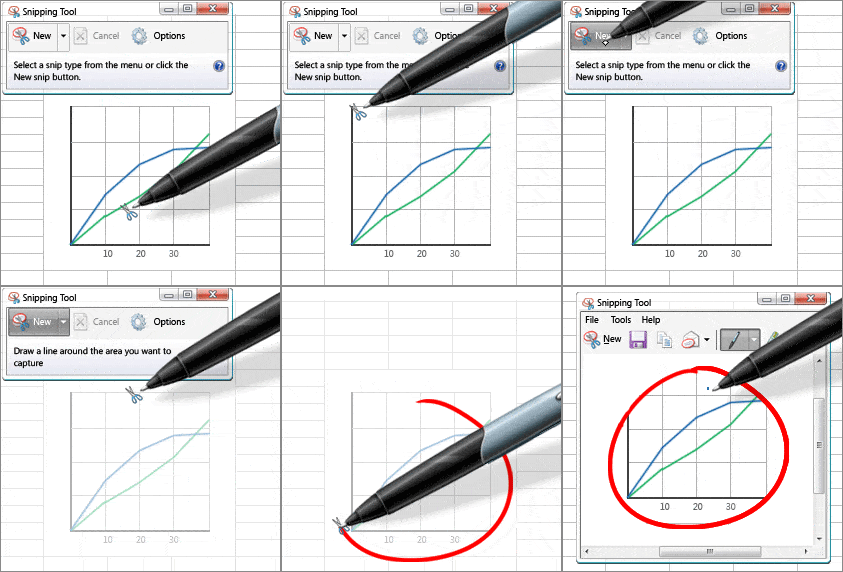
You can use Snipping Tool to capture a screen shot.
Go to Start Menu -> Type in Snip tool
Simply use a mouse or tablet pen to capture any of the following types of snips:

  • Window Snip: Select a window, such as a browser window or dialog box, that you want to capture.
  • Free-form Snip: Draw an irregular line, such as a circle or a triangle, around an object.
  • Full-screen Snip: Capture the entire screen when you select this type of snip.
  • Rectangular Snip: Draw a precise line by dragging the cursor around an object to form a rectangle.

After you capture a snip, it’s automatically copied to the mark-up window, where you can annotate, save, or share the snip.