 Macbooks and all-in-one units like the iMac come with a slew of built-in features that accomplish a variety of tasks thanks to the much-lauded Mac OS X operating system. For those who are new to the Mac platform, it can be a bit difficult to find one’s bearings and become familiar with all that OS X has to offer. One thing that any computer user should be familiar with is how to record a desktop for things like tutorial videos. It’s not that difficult to accomplish, and can be done in a few simple steps.Getting Started
To begin a screen recording, a user will have to find the default screen capture video program. On the latest version of Mac OS X, codenamed “Lion”, the standard desktop recording or “screencasting” program that’s used is QuickTime. The latest version of QuickTime is simply called X, and it boasts a number of improvements over previous versions. It can export and crop screencast video clips, and share clips with others quickly and easily. In order to capture a screencast, a user will need to first locate QuickTime using OS X’s Finder and start it up.Recording The Desktop
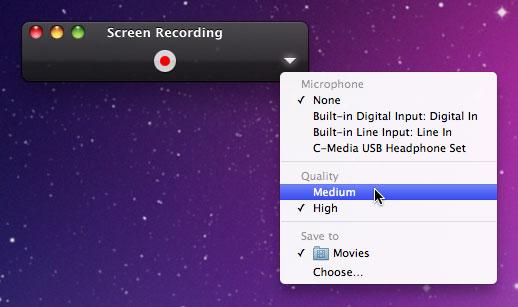
In order to begin a screencast, one must click on the File tab of the QuickTime overhead navigation bar and select “New Screen Recording” from the drop-down menu. If the screencast is being captured on a laptop, the built-in microphone will suffice. Alternatively, one may choose to use an external microphone for better audio quality. Once the “New Screen Recording” tab has been clicked, a small window will pop up with a drop-down menu tab on the extreme right. To use an external microphone, users will have to click that tab and select “Line In”. To begin the actual screencast, users need to click the “Record” button, followed by “Start Recording”. Once finished, users can click the “Stop Recording” square button on the upper menu to end the video.Tips and Tricks
While QuickTime’s recording capabilities are outstanding out of the box using the default settings, users may want to polish their videos a bit before sharing. Resizing and trimming can be accomplished by clicking the “Share” button on the main navigation bar, followed by “Trim”. Users can then crop their videos however they see fit. Once finished, the video in question can be published directly to Youtube by clicking on the “Share” button again and selecting Youtube. Users will be prompted for login credentials, and the video will be automatically uploaded.
Final Thoughts
QuickTime will provide all of the screencasting features that the vast majority of users will ever need. However, there are a number of third-party proprietary and freeware alternatives like Copernicus and Capture Me that also work quite well. When crafting eye-catching and engaging screencasts on a Mac, it’s important to remember that audiences respond to videos that are unique. Add a bit of post-production flair in iMovie to really stand apart from the crowd. In any event, recording screencasts on the Mac OS X platform is easy even for those with no prior experience.
