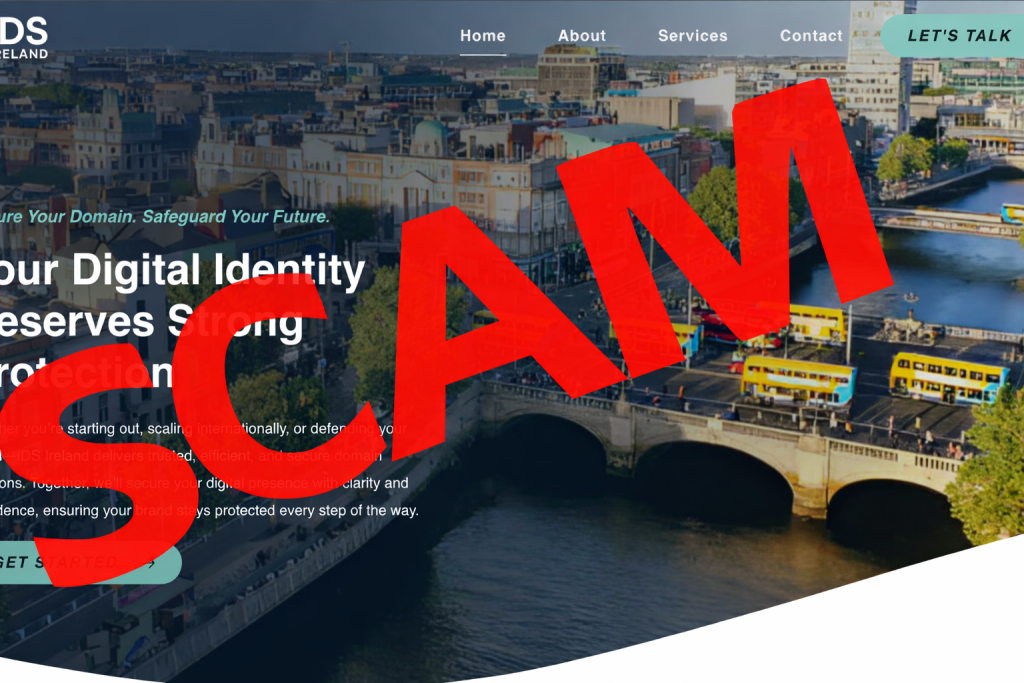
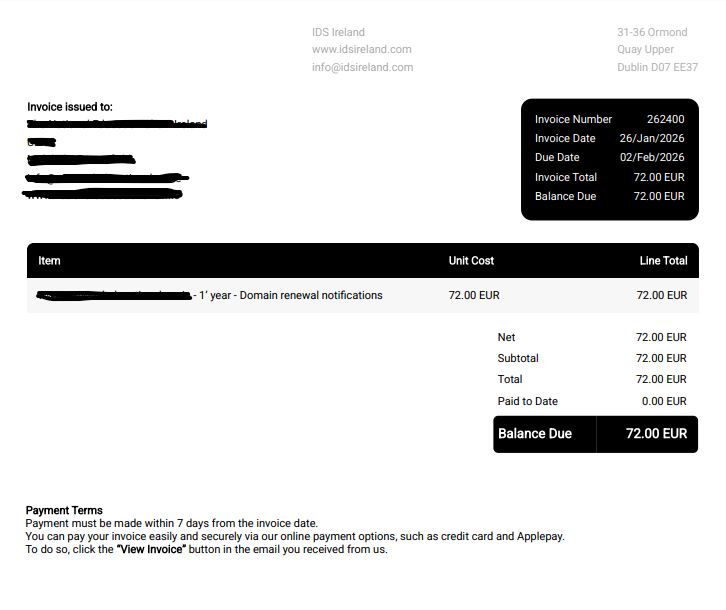
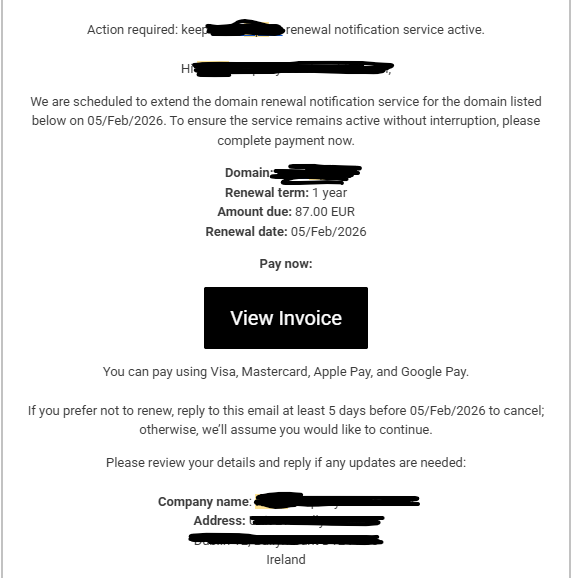
Here are clear, step-by-step ways to find the MAC address on the most common devices. The MAC address is usually shown as six pairs of letters and numbers (for example: 00:1A:2B:3C:4D:5E).

Windows (Windows 10 / 11)

Option 1: Using Settings

  1. Open Settings
  2. Go to Network & Internet
  3. Select Wi-Fi or Ethernet (depending on how you’re connected)
  4. Click your connected network
  5. Scroll down to Physical address (MAC)

Option 2: Using Command Prompt

  1. Press Windows Key + R, type cmd, press Enter
  2. Type: ipconfig /all
  3. Look for Physical Address

macOS (MacBook / iMac)

  1. Click the Apple menu
  2. Go to System Settings (or System Preferences)
  3. Select Network
  4. Choose Wi-Fi or Ethernet
  5. Click Details or Advanced
  6. The MAC address is listed as Wi-Fi Address or MAC Address

Android Phone / Tablet

  1. Open Settings
  2. Go to About phone (or About device)
  3. Tap Status
  4. Look for MAC address

Alternatively (for Wi-Fi only):

  • Settings → Network & Internet → Wi-Fi → Tap your connected network

iPhone / iPad (iOS)

  1. Open Settings
  2. Tap General
  3. Tap About
  4. Scroll down to Wi-Fi Address


Those screenshots show classic fake virus alert pop-ups—they’re designed to frighten you into clicking a button, downloading something, or handing over remote access or payment. These aren’t real system messages from Microsoft, Windows Defender, or any legitimate antivirus.

Here’s what’s going on and what you should do next:

What You’re Seeing

All three images show the same signs of a browser-based scam:

  • Scary wording: “ALL YOUR FILES ARE ENCRYPTED”, “Your PC is infected”, “7 viruses found”.
  • Weird domain names like …lenderaoco.in — genuine Windows alerts never use random web domains.
  • Browser pop-ups styled to look like Windows warnings, but they’re actually just webpages.
  • Buttons like “Update Antivirus”, “Decrypt Files”, “Fix Error” — designed to make you click.

These scams often come from:

  • A malicious advert on a website
  • A hijacked page redirect
  • An accidental click on a fake “download” button

The good news: your files are NOT encrypted, and your system is most likely not infected — unless you clicked or installed something.

What To Do Immediately

1. Do NOT click anything in the pop-ups

Close the browser tab instead.

If it won’t close normally, use:

CTRL + SHIFT + ESC → Task Manager → End Task (Microsoft Edge / Chrome / Firefox)

2. Clear your browser

Clear the following:

  • History
  • Cache
  • Cookies
  • Site permissions

Also check your browser extensions for anything suspicious.

3. Run real security scans

Use legitimate tools only:

  • Windows Security → Virus & Threat Protection → Quick Scan
  • Optional: Run Microsoft Safety Scanner (free from Microsoft).

If you clicked any of the fake warnings, run a full scan.

4. Reset browser settings (if pop-ups return)

Restore your browser to default settings. This removes:

  • Forced redirects
  • Malicious notification permissions
  • Rogue extensions

5. Avoid calling “support numbers” shown in scams

These scams often claim to be:

  • Microsoft Support
  • Windows Security
  • Norton / McAfee

They are all fake. Microsoft never displays phone numbers in alerts.

How to Stop These Pop-Ups in the Future

  • Use a modern browser with tracking protection.
  • Keep Windows updated.
  • Avoid streaming sites with aggressive ads.
  • Install an ad-blocker (uBlock Origin is excellent).
  • Disable browser notifications from unknown websites.

Need Professional Cleanup or Hardening?

If the machine belongs to your business or you want proper protection, CK Computer Solutions – Managed IT Services Dublin can help you:

  • Remove browser hijackers and malware safely
  • Secure your endpoints with proper business-grade antivirus
  • Filter dangerous websites and prevent malicious pop-ups
  • Patch and harden systems so this doesn’t happen again
  • Provide ongoing monitoring and managed protection

If you’d like, I can also talk you through step-by-step cleanup tailored to your device.

Would you like instructions for Windows, Chrome, Edge, or your full PC check-up?


If you spend most of your day at a computer, you’ll know how even the smallest slowdown can throw off your flow. Moving your hand from your keyboard to your mouse mightn’t seem like a major time loss on its own, but add it up across hundreds of actions a day and suddenly you’ve a real productivity leak.

That’s where keyboard shortcuts shine. They’re simple, quick, and—once learned—become second nature. And for busy teams, especially in SMEs where every minute truly counts, shaving seconds off repetitive tasks adds up to hours saved each week.

Below, we’ll explore five of the most powerful shortcuts that can dramatically speed up your work. You might know some already, but when used together, they create a smooth rhythm that keeps you flying through your tasks.

1. Alt + Tab — Move Between Applications Instantly

If you’re constantly flicking between email, spreadsheets, browsers, and chat apps, this shortcut alone can transform your workday. Alt + Tab lets you jump between open programmes without touching the mouse. Hold Alt and tap Tab to cycle through your open windows.

Why it saves time:

  • Eliminates the delay of searching for windows
  • Cuts out mouse wandering
  • Helps maintain focus during multitasking

Pro tip: On macOS, use Command + Tab.

2. Ctrl + C / Ctrl + V — Copy and Paste in Record Time

Yes, everyone knows this one—that’s the point. It’s so widely used because it’s unbelievably effective. Whether you’re copying text, moving files, or duplicating content, the copy/paste duo is the cornerstone of efficient computer use.

Why it saves time:

  • No need to right-click menus
  • Perfect for repetitive tasks
  • Essential for admin-heavy work

Pair it with Ctrl + X to cut instead of copy, and you’ll work even faster.

3. Windows Key + L — Lock Your Screen Quickly

This shortcut is all about security and convenience. Need to nip out for a meeting or grab a coffee? Instead of clicking menus, tap Windows + L and your device locks instantly.

Why it matters:

  • Protects confidential information
  • Reduces risk of unauthorised access
  • Encourages good cybersecurity habits

It’s one of the simplest ways to keep company data safe—and something every employee should know.

4. Ctrl + F — Find Anything in Seconds

From long documents to web pages packed with text, Ctrl + F is your search superpower. Hit the keys, type a word or phrase, and jump right to it.

Where it’s useful:

  • Word documents
  • PDFs
  • Email threads
  • Large spreadsheets
  • Web pages

This is especially powerful in Excel, where finding specific data manually can take far too long.

5. Ctrl + Z — Undo Mistakes Instantly

Everyone makes mistakes—it’s how quickly you recover that counts. Ctrl + Z helps you rewind your last action, whether you deleted something, moved the wrong file, or mistyped text.

Why it’s a lifesaver:

  • Removes fear of making changes
  • Encourages experimentation
  • Prevents unnecessary rework

And across creative tools, writing apps, and spreadsheets alike, undo is your best friend.

The real magic of keyboard shortcuts isn’t in one shortcut alone, but in how they stack together. Using even a handful throughout the day creates a natural rhythm where your hands barely leave the keys. That means:

  • Less time switching tools
  • More focus
  • Fewer interruptions to your thought process
  • Lower physical strain
  • A smoother, faster workflow overall

Across a team, these seconds turn into minutes—and those minutes turn into hours of regained productivity each week.

If you’re onboarding new staff or want to encourage time-saving habits in your team, these shortcuts are a brilliant place to start. They require no setup, no training budget, and no complicated software—just a simple change in habit.

Helping Your Team Get the Most from Their Technology

Efficient computer habits are only part of the bigger picture. To truly streamline workflow and reduce wasted time, businesses also need reliable systems, secure networks, and seamless device management. That’s where CK Computer Solutions – Managed IT Services Dublin can support you.

We help SMEs:

  • Roll out user training on essential tools and productivity shortcuts
  • Keep devices running smoothly so your team avoids downtime
  • Install, configure, and manage hardware and software
  • Strengthen security across all endpoints
  • Provide fast, friendly support whenever staff get stuck
  • Optimise your systems so every minute of your workday counts

Whether you’re upgrading your workplace technology, improving cybersecurity, or simply looking for a dependable MSP to back your team, CK Computer Solutions is ready to help your business work smarter—not harder.


Keeping track of users in your Google Workspace is essential for managing licences, maintaining security, and ensuring your organisation’s data stays organised. Whether you’re preparing for an internal audit, updating HR records, or just reviewing account activity, exporting a full list of users can save time and provide valuable insight into your organisation’s setup.

Here’s a straightforward guide to exporting a list of users directly from the Google Admin Console.


Step 1: Log into the Google Admin Console

Start by heading to the Admin Console at
👉 https://admin.google.com/ac/users?journey=218

You’ll need to sign in with a Google Workspace administrator account to access the Users section. Once logged in, you’ll see the main Users dashboard showing all active accounts across your organisation.


Step 2: Access the User Management Panel

From the user overview screen, you can view, filter, and manage all users within your organisation’s units.
Look at the top of the page and find the “Download users” option (see image below).

This feature lets you export all user information in a downloadable format, which you can easily open later in a spreadsheet.


Step 3: Select Download Options

After clicking “Download users”, a window titled “Download user info” will appear.

Here you can choose what type of data and format you’d like to export. To make sure you have everything, select the following options:

  • Select columns:
    All user info columns and currently selected columns
    (This gives you the complete data set of up to 40 fields, including names, emails, last sign-ins, and organisational units.)
  • Select format:
    Comma-separated values (.csv)
    (Ideal for use with Google Sheets, Excel, or any other spreadsheet application.)

Once you’ve made your selection, click “Download.”


Step 4: Open and Review Your CSV File

Your browser will automatically download a .csv file containing all user information.
You can open this file in:

  • Google Sheets – perfect for cloud collaboration and live editing.
  • Microsoft Excel – ideal for detailed filtering, sorting, and reporting.
  • LibreOffice Calc or similar – if you prefer open-source options.

Once opened, you can easily filter by department, role, or last login time to understand how users are engaging with company tools.

This is also useful when reviewing which accounts are active, suspended, or no longer required — helping you manage licences more efficiently and reduce unnecessary costs.


Step 5: Keep Your User Data Up-to-Date

It’s a good idea to schedule this export periodically (e.g., monthly or quarterly). Doing so ensures your team always has a fresh list of users for HR, security audits, and compliance checks.

You can even automate this process using Google’s API tools or by connecting your Admin Console to reporting dashboards.

If you’re managing multiple domains or departments, creating filters in your spreadsheet can make analysis faster and clearer.


Why Exporting User Data Matters

Exporting user information from Google Workspace isn’t just a technical step — it’s part of responsible IT management.
Here are a few reasons why businesses do it regularly:

  • Security checks: Identify inactive or suspicious accounts.
  • Licence management: Avoid paying for unused accounts.
  • Compliance tracking: Support data protection and HR record audits.
  • User onboarding/offboarding: Ensure accounts are created and removed correctly.

A clear and accurate user list is the foundation of secure, compliant, and well-managed IT operations.


How CK Computer Solutions Can Help

At CK Computer Solutions – Managed IT Services Dublin, we help businesses make the most of their Google Workspace environments. Whether you need help exporting and managing user data, auditing accounts, or automating regular backups and security reports, our team can assist.

We can also integrate your Google Workspace data with your existing business systems, set up secure access controls, and ensure your IT operations run smoothly.
From one-off exports to complete Workspace management, CK Computer Solutions offers tailored support for your organisation’s needs.

If you’d like to streamline your Google Workspace setup or improve visibility into your user accounts, contact us today to see how we can help.


When your Google Workspace account is compromised, the impact can be devastating — from leaked company data to loss of trust with clients. Cybercriminals don’t just stop at your email inbox; once inside, they can access shared drives, calendars, and sensitive business files.

If you suspect that your Google Workspace account has been hacked, here are the exact steps you need to take to secure it quickly.

Step 1: Confirm the Breach

Look out for red flags such as:

  • Emails sent from your account that you didn’t write.
  • Login notifications from strange devices or locations.
  • Changed security settings you didn’t authorise.

Step 2: Secure Access Immediately

  1. Go to myaccount.google.com.
  2. Select SecurityPassword and change it to a strong, unique one.
  3. On the same page, select Manage all devices and Sign out of anything you don’t recognise.

https://myaccount.google.com/security-checkup

Step 3: Enable 2-Step Verification

This is the single best defence against future hacks.

  1. In your Google Account → Security2-Step Verification.
  2. Add your phone, Google Authenticator, or security key.

Step 4: Check Account Activity

Review recent logins:

  • Go to SecurityRecent security events.
  • Look for unfamiliar devices or suspicious locations.

Step 5: Audit Third-Party Acces

Hackers often grant shady apps access to your account.

  1. Go to SecurityThird-party apps with account access.
  2. Remove anything you don’t recognise.

Step 6: Review Email Rules and Recovery Options

Attackers may create hidden rules to forward or delete emails.

  1. Open Gmail SettingsFilters and blocked addresses.
  2. Delete anything suspicious.
  3. Check Forwarding and POP/IMAP for auto-forwarding rules.
  4. Under Security, verify recovery email and phone number.

https://mail.google.com/mail/u/0/#settings/filters

Step 7: Notify Your Team and Admin

If you’re part of a business, let your Google Workspace administrator know. They can:

  • Force password resets for accounts.
  • Lock out suspicious sessions.
  • Review audit logs across the domain.

Step 8: Restore Data if Needed

If files or emails are missing, don’t panic.

  • Use Google Vault (if your organisation has it) to recover lost emails.
  • Admins can also restore files in Google Drive up to 25 days after deletion.
  • For long-term safety, keep regular backups outside Workspace.

How CK Computer Solutions Can Help

Recovering from a hacked Google Workspace account is stressful, especially if sensitive client data is involved. At CK Computer Solutions – Managed IT Services Dublin, we help businesses secure, restore, and protect their Google Workspace environments.

We can:

  • Proactively monitor account activity for suspicious behaviour.
  • Set up multi-factor authentication and security best practices.
  • Integrate email security solutions to block phishing attacks before they land in inboxes.
  • Provide reliable off-site backups so no data is ever truly lost.

With CK as your IT partner, you don’t just recover from an attack — you build stronger defences against the next one.


Why Third-Party Apps Are a Double-Edged Sword

Most businesses rely on third-party applications every day—whether it’s a CRM system, accounting software, file sharing platform, or communication tool. These apps boost productivity, streamline workflows, and reduce costs.

But there’s a catch. Every third-party application you install introduces a new potential entry point for cybercriminals. If it isn’t kept up to date, that entry point can quickly become a serious security risk.


The Hidden Dangers of Outdated Third-Party Apps

Cybercriminals know that many businesses delay updates because of compatibility concerns or disruption fears. That hesitation is exactly what attackers exploit.

Outdated apps can:

  • Contain unpatched vulnerabilities that allow attackers to gain unauthorised access.
  • Cause compatibility issues with newer operating systems or other software.
  • Lead to data breaches, exposing sensitive information such as customer records, payment details, or employee data.

Think of it like leaving the back door of your office unlocked. Even if the front entrance is secure, a determined intruder will find the weak spot.


Real-World Examples

  • The Equifax breach in 2017, affecting over 145 million people, was caused by an unpatched third-party component.
  • In 2021, the Kaseya ransomware attack exploited a vulnerability in IT management software, impacting businesses worldwide.

Both cases underline the same lesson: failing to upgrade third-party apps can have catastrophic financial and reputational consequences.


Compliance and Data Protection Considerations

For companies handling customer or employee data, keeping third-party apps updated isn’t just best practice—it’s often a compliance requirement.

  • GDPR obliges businesses to protect personal data. Running outdated software can be considered a failure in due diligence.
  • Industry standards like ISO 27001 or PCI DSS demand ongoing patch management.

Neglecting updates could put your business at risk of non-compliance, fines, or legal action.


How Businesses Can Manage Updates Effectively

Many organisations struggle to stay on top of updates, especially when using dozens of different third-party apps. The key is to adopt a structured patch management strategy:

  1. Inventory all applications – Know exactly what third-party apps your business relies on.
  2. Prioritise critical updates – Security patches should take precedence over feature enhancements.
  3. Test updates before rollout – Avoid downtime by testing compatibility in a controlled environment.
  4. Automate where possible – Use tools to streamline patch deployment across devices.
  5. Monitor continuously – Keep an eye out for vendor advisories and zero-day vulnerabilities.

How Managed IT Services Can Help

Managing updates across multiple apps can overwhelm internal IT teams, especially in small to medium-sized businesses. This is where a trusted Managed Service Provider (MSP) steps in.

An MSP can:

  • Monitor third-party applications for new updates and vulnerabilities.
  • Test and deploy patches safely to minimise downtime.
  • Provide 24/7 oversight to detect potential security threats.
  • Ensure compliance with data protection regulations.

How CK Computer Solutions Can Help

At CK Computer Solutions – Managed IT Services Dublin, we take the stress out of third-party application management.

Our team can:

  • Audit your current software to identify risks.
  • Implement a structured patch management system.
  • Roll out updates efficiently with minimal disruption to your business.
  • Monitor applications continuously to keep your systems secure.

By partnering with CK Computer Solutions, you can reduce security risks, maintain compliance, and focus on running your business—while we make sure your third-party apps stay updated and protected.


1. What is an SVG and why do attackers love it?

Scalable Vector Graphics (SVG) is a web image format based on XML. Unlike PNG or JPG, SVG files are text files that a browser reads and renders as graphics. Because it’s text, an SVG can also contain links, scripts, and embedded elements. That dual nature—image plus code—makes SVGs incredibly flexible for designers and, unfortunately, very handy for attackers.

Reasons threat actors are leaning into SVG:

  • It looks harmless. An SVG usually arrives as a “picture” of a login page, invoice, or delivery note. People trust images.
  • It slips through filters. Some email and web filters treat images as low risk, especially if they’re small and unremarkable.
  • It can redirect. An SVG can open a phishing site in a new tab, or silently auto-forward the user to a credential harvester.
  • It compresses well. The same payload can be tiny, helping it evade size-based checks and rate limits.

2) How SVG phishing works (with simple examples)

There are three common flavours you’ll see in the wild:

  1. Clickable decoy image:
    The attacker sends an SVG that visually mimics a “View Document” button. The entire image is one big link to a phishing site. The file name sells the story: Invoice_1089.svg, DocuSignNotice.svg, Zoom_Meeting_Details.svg.
  2. SVG as a jump pad:
    The SVG uses an <a> tag or xlink:href inside the graphic to redirect the user. The link may be shortened or obfuscated. When the user previews or opens the “image”, the browser follows the link to a credential page dressed up as Microsoft 365, Google, Zoom, or your payroll portal.
  3. Embedded script or data URI:
    Some SVGs embed JavaScript (depending on how the browser handles it) or a data: URL that decodes to HTML. The net effect is the same: the user ends up at a malicious site, or a fake login form renders right in the browser.

A simplified, recognisable snippet you might see:

There’s nothing fancy in that code—yet it’s enough to trick a busy staff member.

3) Why many security layers miss malicious SVGs

  • MIME and extension whitelisting: Email gateways sometimes treat .svg as an image and don’t deeply inspect it.
  • Inline rendering: Some collaboration tools preview SVGs inline, so users click before thinking.
  • URL detonation gaps: If the SVG points to a redirect that only becomes malicious after a delay (time-bombing), sandboxing may miss it.
  • New domains & link shorteners: Attackers rotate infrastructure to stay ahead of reputation-based filters.

4) Real-world delivery routes

Attackers aren’t fussy. They’ll use whatever works:

  • Email attachments labelled as invoices, HR documents, VoIP messages, or meeting invites.
  • Cloud storage links (OneDrive, Google Drive, Dropbox) where the SVG is hosted and shared “from a known brand”.
  • Chat platforms (Teams, Slack, WhatsApp Business) where short, urgent messages push the recipient to “review asap”.
  • Compromised websites that stuff SEO and lure staff to download a “template” or “policy” that’s actually an SVG.

5) Business impact

SVG phishing is not just a nuisance. It can lead to:

  • Credential theft for Microsoft 365, Google Workspace, payroll, banking, or HR systems.
  • Session hijacking if the lure captures tokens or pushes the user to approve an MFA prompt.
  • Malware delivery where the SVG is the first step before a dropper or info-stealer lands.
  • Business email compromise (BEC) resulting in invoice fraud or payroll diversion.

Once an attacker has an admin or finance mailbox, they can pivot quickly—creating forwarding rules, registering rogue apps, or sending internal-looking requests to suppliers.

6) Prevention for non-technical teams (the quick wins)

You don’t need to be an engineer to reduce risk:

  • Treat unexpected SVGs as suspicious. Genuine suppliers rarely send image files instead of PDFs.
  • Hover before you click. If your email client shows the destination URL, check it. Look closely for misspellings and odd domains.
  • Use known portals. If the message claims to be DocuSign, Microsoft, or your bank, navigate there via your own bookmark—not the email.
  • Pause and verify. A two-minute phone call to the sender (using a known number) beats hours of cleanup.
  • Report easily. Make sure there’s a one-click “Report Phish” button in Outlook/Google Mail so your security team can act fast.

7) Technical hardening for IT teams

Here’s a layered approach that works in Irish SMEs and mid-market organisations:

Email and collaboration

  • Block or quarantine SVG attachments unless there’s a legitimate business case. Create an allow-list for trusted senders if absolutely necessary.
  • Rewrite and scan links (Safe Links/URL Defence equivalents) and detonate attachments in a sandbox. Ensure detonation follows redirects and re-checks links after a delay.
  • Disable inline SVG previews in chat and collaboration tools where feasible.
  • Strip active content at the gateway if your tooling supports SVG sanitisation.

Browsers and endpoints

  • Restrict file associations: Don’t auto-open SVGs in full browsers from email clients.
  • Deploy a modern browser security baseline: Enable Enhanced Safe Browsing/SmartScreen/URL reputation, block risky schemes like data: where business-appropriate, and enforce HSTS.
  • Application control: Use Windows Defender Application Control / AppLocker policies to prevent unauthorised helper apps or script hosts from running.
  • EDR rules: Create detections for suspicious browser children (e.g., cmd.exe, powershell.exe) spawned shortly after opening image files.

Identity and access

  • Enforce phishing-resistant MFA where possible (FIDO2/WebAuthn). If that’s not feasible, use number matching and restrict legacy authentication.
  • Conditional Access: Block authentication from improbable travel, newly unseen devices, or risky sign-ins.
  • App governance: Monitor OAuth app consent and block end-user consent to risky scopes.

Web and application layer

  • Content Security Policy (CSP): If your own sites accept SVG uploads, lock down img-src, object-src, and disallow inline scripts.
  • Sanitise server-side: Strip scripts, external references, and data: URIs from user-supplied SVGs before storing or serving them.
  • Use signed URLs and strict MIME types when serving images to clients.

8) Detection tips: what to look for

Teach your SOC (or managed SOC) to hunt for:

  • Email patterns: A sudden spike in .svg attachments or messages with “view document”, “secure”, “encrypted”, “DHL”, “P60/P45”, “VAT”, “Zoom meeting”.
  • Proxy logs: Short user sessions that begin with loading an .svg and immediately hit an unfamiliar domain, often via 302 redirects.
  • Authentication anomalies: Multiple failed logins followed by an MFA push approval from the same user; impossible travel; sign-ins from headless browsers.
  • Mailbox rules: Newly created auto-forwarding rules to external addresses or rules that hide replies.
  • Endpoint signals: Browser spawning script interpreters or archival tools within seconds of the user opening an “image”.

9) Incident response: a practical playbook

When an SVG phish lands, time is everything. Use this as a checklist:

  1. Triage and contain
    • Identify recipients and whether anyone clicked.
    • Quarantine the email everywhere (search & purge).
    • Block the malicious domain and any redirectors at DNS, firewall, and secure web gateway.
  2. Validate access
    • For any user who clicked, reset passwords, invalidate sessions, and re-enrol MFA if suspicious prompts occurred.
    • Check sign-in logs for the past 7–14 days for unusual locations, devices, or OAuth consent events.
  3. Harden the mailbox
    • Remove rogue mailbox rules and address forwarding.
    • Audit delegated access and app consents.
  4. Forensics
    • Keep the original SVG and message headers.
    • Extract IOCs (domains, IPs, hashes).
    • Review proxy/EDR timelines around the event window.
  5. Recovery and comms
    • Notify affected teams (finance, HR, suppliers) if BEC is suspected.
    • Provide user-friendly guidance: what happened, what to do, and how to avoid a repeat.
  6. Lessons learned
    • Update blocklists, detections, and training material.
    • Consider a temporary, stricter email posture for high-risk roles (finance, execs).

10) Policy, training, and governance

  • Attachment policies: Decide if SVGs are necessary for the business. If not, block them and document the exception process.
  • Supplier due diligence: Ask vendors how they distribute documents. nudge them towards PDFs via secure portals rather than images by email.
  • Role-based controls: Finance and HR should have stronger inbound filtering and stricter Conditional Access rules.
  • Continuous awareness: Use short, monthly micro-lessons with real screenshots of lures you’ve seen internally—keep it relevant to your staff.
  • Tabletop exercises: Run a 60-minute scenario on “SVG-led BEC” with IT, finance, and leadership. Agree who does what, and capture gaps.

Quick reference: red flags your staff can spot

  • File types that don’t match the task (a picture for a document).
  • Urgent language around payments, payroll, or compliance.
  • Links that look like “secure-docs-login[.]com/microsoft” rather than microsoft.com.
  • Requests to sign in again to view a simple file you weren’t expecting.
  • Messages that arrive outside business hours from “internal” people you don’t usually hear from.

A balanced default policy that works well

If you’re unsure where to start, this baseline is sensible for most Irish SMEs:

  • Block inbound .svg attachments by default; allow only for named senders on a case-by-case basis.
  • Enable URL rewriting and delayed link re-scan; detonate attachments and follow redirects during sandboxing.
  • Enforce number-matching MFA and block legacy auth; monitor impossible travel alerts.
  • Use a DNS filtering service to stop newly registered or risky domains at the network edge.
  • Put a “Report Phish” button in the email client and actually act on submissions quickly to build trust.

How CK Computer Solutions – Managed IT Services Dublin can help

SVG phishing sits in that awkward gap between user behaviour and technical nuance. You need both sides right. That’s where we come in.

At CK Computer Solutions – Managed IT Services Dublin, we help Irish businesses reduce phishing risk without slowing the day-to-day work:

  • Email security configuration: We tune Microsoft 365/Google Workspace policies to quarantine risky file types like SVG, enable URL rewriting, and set up sandboxing that re-checks delayed redirects.
  • Identity hardening: We roll out phishing-resistant MFA (or best-practice MFA with number matching), Conditional Access, and session controls so a single click doesn’t become a full breach.
  • Endpoint & browser baselines: We deploy practical Windows security baselines, application control, and EDR detections that spot suspicious behaviour after an “image” opens.
  • Awareness training that sticks: Short, role-based sessions using real examples (including SVG lures) sent to your teams. No scare tactics—just tools people remember.
  • Monitoring & response: Our managed service watches your email and identity logs for patterns that point to SVG or image-led phishing, and we jump on containment fast—blocking domains, invalidating sessions, and cleaning up mailbox rules.
  • Policy & governance support: We’ll help draft and implement attachment handling policies, supplier requirements, and exception workflows so the business keeps moving while staying safe.

If you’d like a quick health check on your current setup—or want us to test how your filters handle a benign SVG sample—reach out to CK Computer Solutions. We’ll tailor a plan that fits your organisation, your budget, and the way your people actually work.


Microsoft has officially announced that Windows 10 will reach its end of life in October 2025, meaning no more security updates, bug fixes, or official support. If your business or personal devices are still running Windows 10, now is the right time to start planning your upgrade to Windows 11.

Upgrading is not just about keeping up with the latest look; it’s about ensuring your computers remain secure, compliant, and efficient. This guide will walk you through the process of upgrading from Windows 10 to Windows 11, highlight the key requirements, and explain what you need to prepare before making the switch.


Why Upgrade to Windows 11 Before Windows 10 End of Life in 2025?

Upgrading isn’t just about keeping your PC looking modern. It’s a matter of security, compliance, and productivity.

Here’s why making the move matters:

  • Enhanced Security – Windows 11 requires TPM 2.0 and Secure Boot, making it more resistant to cyberattacks.

  • Streamlined Interface – A centred Start menu, simplified design, and more intuitive navigation.

  • Improved Productivity Tools – Snap layouts, multiple desktops, and Microsoft Teams integration for collaboration.

  • Future-Proofing – Avoid risks of running unsupported software beyond 2025.

 For Irish businesses, delaying the upgrade could lead to compliance issues, data breaches, and downtime. 

Windows 11 Compatibility: Can My PC Run It?

Not every Windows 10 device can upgrade. Microsoft introduced new hardware requirements. Here’s what you’ll need:

  • Processor: 1GHz or faster with at least 2 cores (64-bit).

  • RAM: 4GB minimum.

  • Storage: 64GB or more.

  • Firmware: UEFI with Secure Boot enabled.

  • TPM (Trusted Platform Module): Version 2.0.

  • Graphics: DirectX 12 compatible with WDDM 2.0 driver.

  • Display: 9-inch screen or larger, 720p minimum.

👉 Download Microsoft’s free PC Health Check tool to see if your computer is eligible.

If your PC isn’t compatible, you may need a hardware upgrade before moving to Windows 11.

How to Back Up Your Data Before Upgrading

Before making the jump, secure your files. A proper backup ensures nothing gets lost.

Options include:

  • Cloud Backup – Use OneDrive or another cloud service.

  • External Hard Drive – Copy key documents, photos, and files.

  • Business Backup Solutions – Centralised systems for multi-device protection.

💡 For businesses in Ireland, a managed backup solution ensures that every workstation and server is protected during the migration.

Methods to Upgrade from Windows 10 to Windows 11

There are three main ways to install Windows 11:

1. Windows Update (Easiest Method)

If your PC is eligible, you may already see the upgrade option.

  • Go to Settings > Update & Security > Windows Update.

  • Select Check for updates.

  • If Windows 11 is available, click Download and Install.

2. Windows 11 Installation Assistant

If the update doesn’t appear, download Microsoft’s Installation Assistant.

3. Clean Installation

For a fresh start, create a bootable USB. This wipes your device and installs Windows 11 from scratch.

  • Recommended for older or slow machines.

  • Be sure to back up all files before doing this.


Common Issues During Upgrade and How to Fix Them

  • TPM or Secure Boot Disabled – Enable these settings in BIOS/UEFI.

  • Insufficient Storage – Clear unnecessary files or add external storage.

  • Driver Issues – Update hardware drivers after the upgrade.

  • Slow Performance – Install the latest updates and patches after the upgrade completes.

Business Upgrade Planning: Smooth Migration to Windows 11

For individual users, the process is simple. But businesses managing multiple devices face bigger challenges.

Key considerations for Irish companies:

  • Application Testing – Ensure critical apps work on Windows 11.

  • Hardware Audit – Identify which PCs are compatible and which need replacing.

  • Staff Training – Reduce disruption by familiarising employees with the new layout.

  • Security Alignment – Update cybersecurity policies to fit Windows 11’s requirements.

Rolling out Windows 11 should be planned and phased to minimise downtime.

CK Computer Solutions – Helping Irish Businesses Upgrade to Windows 11

At CK Computer Solutions – Managed IT Services Dublin, we help businesses across Ireland upgrade securely and efficiently.

Here’s how our team supports you:

  • Compatibility Checks – We assess your systems for Windows 11 readiness.

  • Upgrade Strategy – Phased rollout with minimal disruption.

  • Data Protection – Full backup and migration services.

  • Hardware Supply – New Windows 11-ready PCs and laptops installed for you.

  • Ongoing Support – 24/7 IT helpdesk, security monitoring, and patch management.

If your business is still running Windows 10, now is the perfect time to plan the transition. With CK Computer Solutions managing the process, you’ll move to Windows 11 smoothly, securely, and with zero downtime.


Phishing remains one of the most effective ways cybercriminals infiltrate businesses. While most people know to be cautious of suspicious attachments or links, attackers are becoming increasingly sophisticated in disguising their scams. One of the latest tactics involves fake Zoom document invites, designed to trick recipients into handing over their login credentials.

With remote and hybrid working now a permanent part of business life, employees are accustomed to receiving Zoom meeting invitations and shared links. This makes Zoom-branded phishing emails particularly convincing and dangerous if not identified quickly.


What is a Zoom Document Phishing Link?

A Zoom document phishing link is a fraudulent email or message crafted to look like it came from Zoom. Instead of delivering a genuine meeting invite or document, it lures the recipient into clicking a malicious link.

The message often contains wording such as:

  • “You are invited to view a document”
  • “Support Document has shared a file with you”
  • “Click here to access your meeting notes”

These messages are designed to create urgency and curiosity, encouraging users to click without thinking.

In reality, Zoom does not provide a service called “Zoom Docs” or “Zoom Documents.” Any such message is a clear sign of a phishing attempt.


How These Scams Work

The scam follows a predictable but effective pattern:

  1. The hook – An email lands in your inbox looking like it’s from Zoom, complete with branding and buttons.
  2. The lure – The email urges you to click a “View Document” or “Open Doc” link.
  3. The trap – Instead of taking you to Zoom, the link redirects to a fake login page.
  4. The theft – If you enter your Microsoft 365, Gmail, or Zoom credentials, attackers capture your details instantly.
  5. The aftermath – Cybercriminals use the stolen information to access business emails, sensitive files, or even spread further phishing campaigns from your account.

The example screenshot you shared shows this clearly: vague messaging, suspicious sender details, and fake buttons that don’t lead anywhere legitimate.


Red Flags to Watch Out For

While some phishing emails are poorly written, others can be very convincing. Always look for these warning signs:

  • Unknown sender – The email claims to be from Zoom but comes from an unfamiliar or strange domain.
  • Generic messages – “You are invited to view document” without context is a big red flag.
  • Unrealistic services – Zoom does not offer “Zoom Docs.”
  • Suspicious links – Hovering over the link reveals it does not lead to zoom.us.
  • Urgency and threats – “View immediately” or “Your account will be suspended” tactics.
  • Brand inconsistencies – Logos stretched, incorrect colours, or poor formatting.

Training your team to recognise these signs can stop a phishing attack before it succeeds.


Why Businesses Are Being Targeted

Cybercriminals know that businesses rely heavily on collaboration tools like Zoom. By imitating them, attackers gain a higher chance of success. There are several reasons why SMEs in particular are targeted:

  • High email traffic – Staff receive multiple meeting invites daily, so fake ones blend in.
  • Lower security awareness – Not all companies run regular phishing training.
  • Credential value – Stolen Microsoft 365 or Google Workspace logins can open up an entire company’s systems.
  • Gateway for larger attacks – Once inside, attackers may launch ransomware, data theft, or financial fraud.

Consequences of Falling Victim

The damage from a successful phishing attack can be severe:

  • Data breaches – Sensitive customer or business data may be exposed.
  • Financial loss – Attackers could initiate fraudulent payments or demand ransom.
  • Reputation damage – Clients may lose trust if their information is compromised.
  • Regulatory penalties – Under GDPR, businesses face heavy fines for data breaches caused by negligence.
  • Operational disruption – Compromised accounts can paralyse day-to-day work.

For SMEs, even a single phishing incident can cause long-lasting harm.


Practical Steps to Protect Your Business

The good news is that businesses can take proactive steps to defend against these scams.

  1. Implement email filtering – Use advanced filters to catch phishing attempts before they hit inboxes.
  2. Educate employees – Run regular training sessions with real-world phishing examples.
  3. Enable multi-factor authentication (MFA) – Even if credentials are stolen, MFA provides a second layer of protection.
  4. Keep software updated – Outdated systems are easier to exploit.
  5. Establish reporting procedures – Make it easy for staff to flag suspicious emails.
  6. Test with phishing simulations – Conduct controlled phishing tests to measure awareness.

A layered security approach reduces the chance of a single click causing catastrophic damage.


How CK Computer Solutions Can Help

At CK Computer Solutions – Managed IT Services Dublin, we specialise in keeping businesses safe from threats like phishing. Our services include:

  • Email security solutions – Filtering and protection to stop malicious links before they reach your staff.
  • Cybersecurity awareness training – Practical sessions to teach your team how to spot scams like fake Zoom document invites.
  • Multi-factor authentication setup – Adding an extra layer of protection across your Microsoft 365, Zoom, and other critical accounts.
  • Continuous monitoring and support – We watch your systems 24/7, responding rapidly to suspicious activity.
  • Strategic IT partnership – Beyond security, we ensure your entire IT environment is efficient, compliant, and future-proof.

By partnering with CK Computer Solutions, you gain not only protection from threats like Zoom phishing attacks but also a trusted IT partner invested in your business success.


There are three main relay methods in Microsoft 365:


1. SMTP Client Submission (Preferred if possible)

  • Uses port 587 with TLS and authentication (username + password).
  • Works best for apps/devices that support modern authentication.
  • Each device must be configured with a licensed mailbox account.
  • Settings:
    • SMTP server: smtp.office365.com
    • Port: 587
    • Encryption: TLS
    • Username: mailbox email address (e.g. scanner@yourdomain.com)
    • Password: mailbox password / app password (if MFA enabled).

2. Direct Send

  • Sends mail directly to Office 365 without authentication.
  • Only works when sending to internal recipients (inside your domain).
  • Useful for devices that cannot authenticate.
  • Requirements:
    • Device must be on your public IP that’s allowed in Exchange Online.
    • Use your Microsoft 365 MX endpoint as the SMTP server (e.g. yourdomain-com.mail.protection.outlook.com).
    • Port: 25
    • TLS: optional, but recommended.

3. Office 365 SMTP Relay (Connector-based)

  • More flexible: allows sending to internal and external recipients.
  • You create a mail flow connector in Exchange Online that authorises by public IP address.
  • Steps:
    1. Log into Microsoft 365 Admin CenterExchange Admin Center.
    2. Go to Mail flow → Connectors → Add new.
    3. Choose:
      • From: Your organisation’s email server
      • To: Office 365
    4. Give it a name (e.g. “Office devices relay”).
    5. Specify the public IPs of your devices/apps that will send mail.
    6. Save connector.
    7. Configure devices/apps with:
      • SMTP server: yourdomain-com.mail.protection.outlook.com
      • Port: 25
      • No authentication needed.
      • TLS if supported.

Which option should you choose?

  • If device supports authentication → use SMTP client submission.
  • If only internal mail → direct send.
  • If external mail needed & no authentication support → connector-based relay.

Contact Us